
Turn on QuickBooks class tracking in QuickBooks Online Plus or Advanced to segment your Profit & Loss by department, product line, or service type — and see exactly where your business makes and loses money. The setting lives at Settings > Account and Settings > Advanced > Categories > Track classes. Once it's on, you'll choose between two assignment modes: "One to entire transaction" (simpler, works when every line item belongs to the same segment) or "One to each row in transaction" (more precise, required when a single invoice mixes items from different business segments). Before you enable anything, confirm your subscription. Class tracking is available in QuickBooks Online Plus and Advanced, and in QuickBooks Desktop — not in Simple Start or Essentials.
Key Takeaways
QuickBooks class tracking gives small businesses a clear Profit & Loss by segment — but only when the class list is simple, the assignment mode matches your invoice structure, and the right QuickBooks plan is in place.
| Point | Details |
|---|---|
| Enable on the right plan | Class tracking requires QuickBooks Online Plus, Advanced, or QuickBooks Desktop — not Simple Start or Essentials. |
| Choose assignment mode carefully | Use "One to each row" for mixed-item invoices; "One to entire transaction" only when every line belongs to the same segment. |
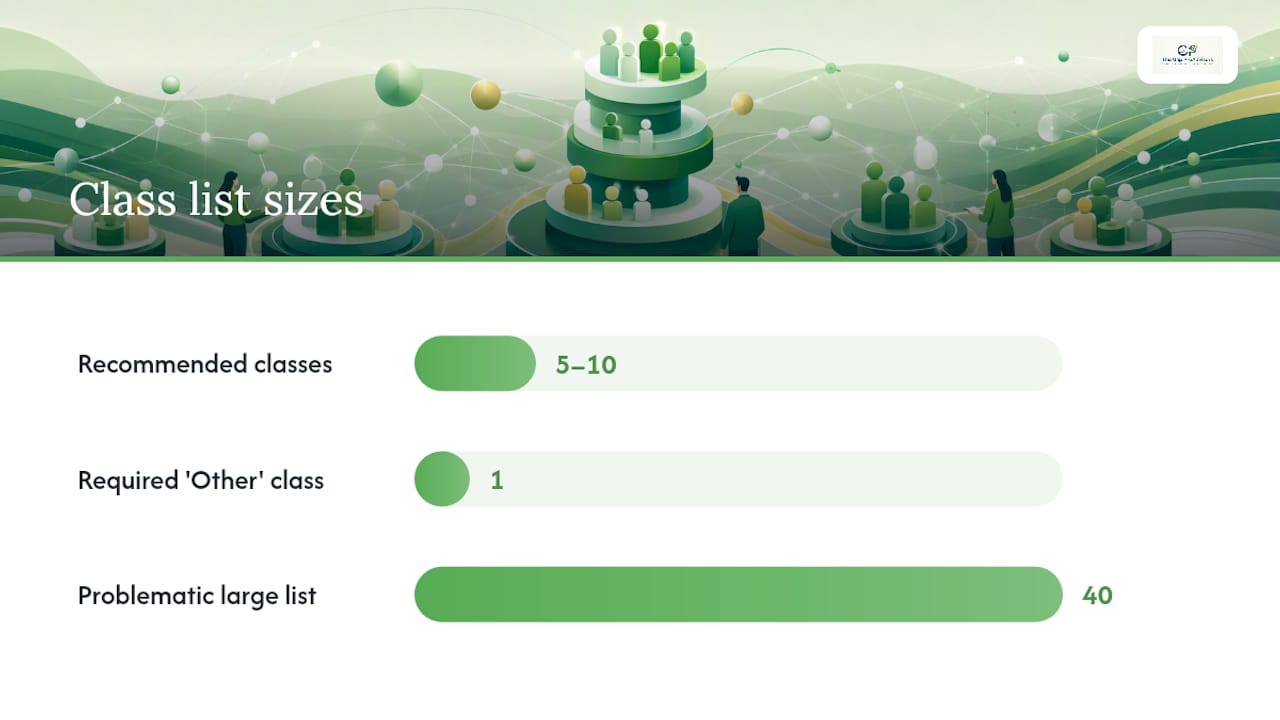
| Keep the class list short | Five to ten classes is enough for most small businesses; deactivate unused classes quarterly to keep reports clean. |
| Run Profit & Loss by Class monthly | This report shows which segments are profitable and which are not — it's the primary payoff of class tracking. |
| Mygappro handles setup and cleanup | The Gap ProAdvisors offers flat-rate QuickBooks class setup, reclassification, and monthly reporting support remotely. |
This article is general information, not a substitute for advice from a qualified financial advisor. Consult a qualified financial professional about your own circumstances before acting on anything here.
Table of Contents
- How to turn on class tracking in QuickBooks Online
- How to create and organize your class list
- How to assign classes to transactions
- Which class-based reports should you run?
- Which QuickBooks plans include class tracking?
- Troubleshooting missing class options and common mistakes
- Best practices: naming, maintenance, and Classes vs. Locations vs. Projects
- When to set up class tracking yourself and when to call a pro
- The Gap ProAdvisors handles QuickBooks class setup and cleanup for you
- Sources
- FAQ
How to turn on class tracking in QuickBooks Online
The exact path is short, but the order matters. Here are the steps for QuickBooks Online Plus and Advanced:
- Click the gear icon (Settings) in the upper right corner.
- Select Account and Settings.
- Go to the Advanced tab.
- Under Categories, toggle on Track classes.
- Set the Assign classes option: choose "One to entire transaction" or "One to each row in transaction."
- Click Save, then Done.
For QuickBooks Desktop, the path is different: go to Edit > Preferences > Accounting > Company Preferences, then check Use class tracking for transactions. You can also enable the optional prompt that asks users to assign a class on every transaction — useful for teams that tend to skip the field.
Payroll note: When you enable class tracking, it applies to future payroll transactions only. Existing paychecks already processed won't be retroactively tagged. You can assign a single class to all employees or set a class per employee in payroll settings — but any change takes effect on the next payroll run, not the current one.
Troubleshooting: If the Class Tracking options don't appear in your Payroll settings, the fix is straightforward. Turn class tracking off, sign out of QuickBooks completely, sign back in, and then turn class tracking on again. That refresh resolves the display issue in most cases.
Pro Tip: Make any settings changes during a low-transaction hour — early morning or after business hours — so you're not interrupting active data entry. If you're on QuickBooks Desktop, test the change in a backup copy of your company file first.
How to create and organize your class list
A clean class list is the foundation of useful reporting. You build it at Settings > All Lists > Classes > New.
Every class you create can have sub-classes nested up to five levels deep, though two levels is usually enough for a small business. The structure should mirror how you think about your business segments — not your chart of accounts.
Intuit recommends starting with broad segments and adding sub-classes only when your reports consistently show a need for more detail. Creating 30 granular classes on day one produces cluttered reports that nobody reads.
Naming conventions that work: Use short, consistent labels. Capitalize the first word. Avoid abbreviations that only you understand six months from now. "Services" beats "SVC-DEPT-A."
Here's a compact class structure that works for most small service or product businesses:
| Class (Parent) | Sub-class (Optional) | Use case |
|---|---|---|
| Services | Consulting | Professional service revenue and costs |
| Services | Maintenance | Recurring service contracts |
| Products | Retail | Physical goods sold in-store or online |
| Products | Wholesale | Bulk orders to resellers |
| Admin | (none) | Overhead and internal costs |
| Other | (none) | Uncategorizable items — catch-all |
When a class is no longer active, make it inactive rather than deleting it. Deleting a class removes its label from historical transactions, which corrupts past reports. Making it inactive preserves every historical tag while removing the class from your active selection menus.
How to assign classes to transactions
Most transaction types in QuickBooks Online accept a class field: invoices, sales receipts, bills, checks, credit card charges, purchase orders, expense entries, and paychecks. The class field appears as a column or dropdown during transaction entry — you won't see it until class tracking is enabled.
Choosing your assignment mode:
- "One to entire transaction" assigns a single class to the whole invoice or bill. Use this when every line item on that transaction belongs to the same business segment. It's faster and works well for businesses with clean, single-segment transactions.
- "One to each row in transaction" lets you assign a different class to each line item. Use this whenever one invoice or bill mixes items from different segments. For example, if you bill a client for both consulting hours and a product sale on the same invoice, row-level assignment keeps your segment P&L accurate.
For mixed-item invoices, row-level assignment isn't optional — it's the only way to prevent revenue and cost of goods from being misattributed to a single class.
Payroll class assignment: You can assign a class to each employee individually, or apply one class to all employees. Either way, the assignment applies starting with the next payroll run. Changes don't backfill.
Changing a class on an existing transaction: Open the transaction, update the class field, and save. For a handful of transactions, that's the practical approach. For dozens or hundreds of misclassified entries, QuickBooks Online Advanced includes a bulk reclassify tool that lets you filter and reassign classes across many transactions at once — a significant time saver during cleanup projects.
Pro Tip: For service businesses that sell both hourly work and physical products, set your default to "One to each row in transaction" from the start. Switching later means manually correcting every mixed-item invoice you've already entered.
Which class-based reports should you run?
QuickBooks Online offers several dedicated class reports, each suited to a different question:
Profit & Loss by Class is the most valuable report for most small businesses. It shows revenue, expenses, and net income broken out by class in side-by-side columns. Run it monthly to see which segments are profitable and which are dragging down your overall numbers.
Sales by Class Summary and Sales by Class Detail show you which classes are generating the most revenue. The Summary version gives you totals; the Detail version shows individual transactions. Use the Detail report when you need to verify that transactions were tagged correctly.
Purchases by Class Detail breaks down your spending by class — useful for tracking costs against each business segment and spotting where overhead is accumulating.
To run any of these: go to Reports, search the report name, set your date range, and apply any class filter you need. You can also filter most standard QuickBooks reports by class using the filter panel on the right side of the report screen. To export, click the export icon and choose Excel or PDF.
For budget comparison, you can create a budget per class in Company > Budgeting and then run a Budget vs. Actuals by Class report to see how each segment is tracking against plan month by month.
Which QuickBooks plans include class tracking?
Class tracking is not available on every QuickBooks Online plan. Here's how the editions compare:
QuickBooks Online Plus caps combined classes and locations at 40. For most small businesses with a simple class structure, that's more than enough. If you're running multiple locations AND multiple class segments, you can hit that ceiling faster than expected — especially once sub-classes count toward the total.
QuickBooks Online Advanced removes the cap entirely and adds tools that matter for growing businesses: bulk reclassify, a custom report builder, and spreadsheet sync. If you're managing more than 15–20 active classes or need to correct historical class assignments across hundreds of transactions, Advanced is worth the upgrade.
QuickBooks Desktop supports class tracking across invoices, bills, payroll, and most other transaction types. The optional "prompt to assign" setting in Desktop is particularly helpful for teams — it flags any transaction saved without a class so nothing slips through untagged.
Only users with admin or appropriate permissions can create and manage classes. Restrict that access to your bookkeeper or a designated team member to keep the class list from growing out of control.
Troubleshooting missing class options and common mistakes
When class options are missing:
- Verify your subscription is QuickBooks Online Plus or Advanced — Simple Start and Essentials don't include class tracking.
- Go to Settings > Account and Settings > Advanced > Categories and confirm the Track classes toggle is on.
- If the class field still doesn't appear in Payroll settings, turn class tracking off, sign out of QuickBooks, sign back in, then turn class tracking on again.
- Clear your browser cache or try a different browser if the toggle appears stuck.
- Contact Intuit support if the issue persists after the above steps.
Common setup mistakes to avoid:
- Too many granular classes. Starting with 25 sub-classes produces reports nobody can interpret. Start broad, add detail only when a reporting need is clear and repeated.
- Using classes for job-costing. QuickBooks Projects is built for that. Using classes instead produces inaccurate job-level profitability and clutters your segment reports.
- Deleting classes instead of deactivating them. Deleted classes leave historical transactions untagged, which breaks your historical P&L by Class reports.
- Inconsistent payroll class mapping. If some employees have a class assigned and others don't, your payroll costs won't roll up cleanly into your segment P&L.
Reclassifying transactions: For a small number of errors, open each transaction and update the class field manually. For mass corrections, Advanced users can use the bulk reclassify tool. If you're looking at hundreds of misclassified entries across multiple years, that's a cleanup project best handled by a bookkeeper — the logic needs to be documented so future entries stay consistent.
Best practices: naming, maintenance, and Classes vs. Locations vs. Projects
Keep your class list high-level. A class list with five to ten entries produces readable, actionable reports. One with forty entries produces a spreadsheet that requires its own decoder ring. Always create an "Other" class as a catch-all for items that don't fit neatly — it's better than leaving the field blank.
Review your class list quarterly. Deactivate any class that hasn't been used in the past two quarters. Making a class inactive preserves its history while removing it from active menus — a clean list reduces data entry errors.
Classes vs. Locations vs. Projects: These three QuickBooks features solve different problems.
- Classes track business segments: departments, product lines, service types. Use classes when you want a P&L broken out by how your business is organized internally.
- Location tracking tracks physical or operational sites: storefronts, offices, territories. Use it when the question is "which location made money?" not "which product line?"
- Projects handle job-costing: tracking revenue, expenses, and labor against a specific client engagement or contract. Intuit explicitly recommends Projects for job-costing rather than trying to force that function onto the class field.
You can use Classes and Locations simultaneously in QuickBooks Online — they're independent features. But using Classes as a substitute for Projects or Locations creates reporting confusion that's hard to untangle later.
Multi-currency note: If you're using QuickBooks Online with multi-currency enabled, class assignment works the same way, but your class-based reports will reflect the home currency conversion. Verify that exchange rate settings are current before relying on class reports for cross-currency segment analysis.
Pro Tip: Name your classes so they read clearly in a report column header. "Consulting Services" is better than "CS" or "Consult." When you export a Profit & Loss by Class to Excel, those column headers become your report labels — make them self-explanatory.
When to set up class tracking yourself and when to call a pro
Most small business owners can turn on class tracking and build a basic class list in under an hour. The settings path is straightforward, and a simple five-class structure covers the majority of use cases without professional help.
Where things get complicated is the cleanup side. When a business has been running QuickBooks for a year or two without class tracking, then decides to add it, the historical data is untagged. Retroactively assigning classes to hundreds of past transactions is tedious, and doing it inconsistently creates a P&L by Class that's worse than no class report at all.
The other common situation is a chart of accounts that's grown into something that classes can't fix on their own. If your accounts are already duplicated, misnamed, or structured around job-costing logic that should live in Projects, adding classes on top of that structure compounds the problem. A bookkeeper who knows QuickBooks well can redesign the class list, reclassify historical transactions in bulk (using Advanced's tools where available), and document the logic so your team enters data consistently going forward.
One practical note on access: when you hand QuickBooks access to a third party, use QuickBooks' built-in user permission settings to limit what they can see and edit. Never share your admin credentials directly.
The Gap ProAdvisors handles QuickBooks class setup and cleanup for you
Setting up class tracking correctly from the start saves hours of cleanup later. Mygappro offers flat-rate remote bookkeeping services that include QuickBooks class list design, transaction reclassification, payroll class mapping, and monthly Profit & Loss by Class reporting — so you get accurate segment data without managing it yourself.
If your class setup is already a mess, the QuickBooks books cleanup service covers historical reclassification, chart of accounts cleanup, and a documented class structure your team can follow going forward. Access is handled through a secure online portal, pricing is fixed (no surprise hourly bills), and most cleanup engagements are completed within two to three weeks. Schedule a free QuickBooks health check to find out exactly what needs fixing before committing to anything.
Sources
- Turn on class tracking - QuickBooks - Intuit
FAQ
Which QuickBooks plans include class tracking?
QuickBooks Online Plus and Advanced both include class tracking, as does QuickBooks Desktop. Simple Start and Essentials do not support the feature.
What is the difference between class tracking and location tracking in QuickBooks?
Classes segment your business by type — departments, product lines, or service categories. Location tracking segments by physical or operational site. You can use both simultaneously in QuickBooks Online Plus and Advanced.
How does class tracking work in QuickBooks Desktop?
In QuickBooks Desktop, go to Edit > Preferences > Accounting > Company Preferences and check Use class tracking for transactions. You can also enable a prompt that reminds users to assign a class on every transaction they save.
How do I enable class tracking in QuickBooks Online?
Go to Settings > Account and Settings > Advanced > Categories, toggle on Track classes, choose your assignment mode, and click Save. The class field then appears on invoices, bills, checks, and other supported transactions.
Can Mygappro help if my class assignments are already incorrect?
Yes. The Gap ProAdvisors offers a QuickBooks books cleanup service that covers historical reclassification and class list redesign, with fixed pricing and a typical turnaround of two to three weeks.