
QuickBooks can absolutely deliver accurate job costing, but only once you enable the right structure: Projects in QuickBooks Online or a Customer:Job hierarchy in QuickBooks Desktop, combined with two-sided items and burdened labor rates. Miss any one of those three pieces, and your reports will look complete while quietly hiding your real numbers.
Here's what to do in the next ten minutes:
- QuickBooks Online: Turn on Projects under Settings, then create your first project and attach it to a customer.
- QuickBooks Desktop: Set up a Customer:Job structure by adding a job underneath the relevant customer record.
- Either version: Build two-sided items in your Products and Services list so every cost and every sale routes through the same line item.
- Labor: Set an hourly cost rate for each employee that includes wages, payroll taxes, workers' comp, and benefits, not just their paycheck rate.
The single most important habit you'll build after that setup is tagging. Every bill, check, expense, and timesheet entry needs a job attached to it, or your Project Profitability report will understate your real costs. Set up your first project or job today, even before you've built out every item and rate. You can refine the details later, but a job started late can never recover the transactions you already coded without one.
Key Takeaways
Accurate job costing in QuickBooks depends on enabling Projects or Customer:Job, using two-sided items, setting burdened labor rates, and tagging every transaction without exception.
| Point | Details |
|---|---|
| This week | Enable Projects (QBO) or create Customer:Job (Desktop) and build your first project with two-sided items for common cost categories. |
| approximately one to two months | Implement time capture with hourly burden rates and tag any historical unbilled costs to the correct job. |
| approximately two to three months | Compare estimates to actuals by job type and decide whether a WIP or AIA add-on is truly required. |
| Ongoing discipline | Review Project Profitability weekly and update burden rates every quarter as payroll costs shift. |
| Professional support | Mygappro sets up job costing correctly and maintains tagging accuracy monthly through its remote bookkeeping services. |
Official Docs and Guides Worth Bookmarking
If you use QuickBooks Online, start with Intuit's own Projects and job costing overview, which covers plan requirements and the Project Profitability report directly. If you're on Desktop, Intuit's Desktop job-costing support article walks through Customer:Job setup and the report names specific to that version.
- Contractor Guide Pro's job-costing setup guide for plan comparisons and realistic monthly costs.
- Accounting Fresh's contractor-focused QBO guide for item and time-capture verification steps.
- Miter's implementation walkthrough for two-sided items and hourly cost rate setup.
This article is general information, not a substitute for advice from a qualified financial advisor. Consult a qualified financial professional about your own circumstances before acting on anything here.
Table of Contents
- What Is Job Costing in QuickBooks?
- How Do You Set Up Job Costing in QuickBooks Online?
- How Do You Track Job Costs in QuickBooks Desktop?
- Where Do Labor, Materials, and Overhead Costs Belong?
- Which Reports Actually Show Job Profitability?
- Best Practices and Common Mistakes in QuickBooks Job Costing
- Which Integrations Actually Improve Job Costing?
- How The Gap ProAdvisors Helps With QuickBooks Job Costing
- Editorial Perspective: What Contractors Get Wrong About Job Costing
- Job Costing Made Simple With Mygappro
- Sources
- FAQ
What Is Job Costing in QuickBooks?
Job costing means tracking every dollar of income and expense against a specific project instead of lumping it into your overall company books. QuickBooks handles this through two very different mechanisms depending on which version you run, and confusing the two is the most common setup mistake contractors make.
In QuickBooks Online, Projects groups estimates, invoices, bills, time entries, and expenses into a single project bucket, so you can pull up one project and see everything tied to it in one screen. It behaves like a folder that automatically files every transaction connected to that customer and job together, then compares what you estimated against what actually happened.
QuickBooks Desktop takes an older but still effective approach. It uses a Customer:Job structure, where each job lives underneath a parent customer, and a "Customer:Job" column appears on bills, checks, and invoices so you tag each transaction manually. Desktop's job-costing setup relies on separate estimate forms linked to that job, and separate reports pulled by job rather than one consolidated project view.
Not every QuickBooks Online plan includes Projects. It ships with Plus and Advanced, but not Simple Start or Essentials, and contractors comparing job costing software often assume any QBO subscription includes it. Contractors typically need QBO Plus or Advanced specifically because budget-versus-actual tracking and the Projects center live behind that plan tier.
Which one fits your business? If you're running a cloud-based operation with a smaller crew, want mobile time tracking synced automatically, and like having one dashboard per job, Projects in QuickBooks Online is the better fit. If you've built years of job-cost history in Desktop, rely on its more granular estimate-to-actual reports, or work in an industry where your accountant still prefers Desktop's job-costing detail, staying put often makes more sense than migrating mid-year.
How Do You Set Up Job Costing in QuickBooks Online?
Setting up job costing in QuickBooks Online starts with turning on the feature, but the real work happens in how you structure items and tag transactions afterward.
- Enable Projects. Go to Settings, then Account and Settings, then Advanced, and turn on Projects. This unlocks the Projects center in your left navigation.
- Turn on time tracking and progress invoicing. Both live in the same Advanced settings screen and are required if you plan to bill in stages or track crew hours by job.
- Create a project for each job. Attach it to the correct customer record. If you skip this step and instead code transactions to a customer with no project, none of that activity will show up in your Project Profitability report.
- Build two-sided items in your Products and Services list. A two-sided item has both an income account and an expense account attached, so the same item (say, "Framing Labor") tracks what you billed the customer and what it cost you to deliver.
- Enter an estimate inside the project, not as a standalone estimate attached only to the customer. This is what lets QuickBooks compare estimates to actuals automatically.
- Tag every transaction to the project as you enter it: bills, checks, expenses, and time entries. This is the step contractors skip most often, and it's the one that breaks everything downstream.
A practical naming convention saves headaches later. Use a format like "2026 Johnson Kitchen Remodel" rather than just "Johnson" so when you're scanning a list of forty active projects three years from now, you know exactly what you're looking at. If you invoice using cost codes similar to construction industry standards, mirror those codes in your Products and Services list so a report pulled from QuickBooks lines up with your estimate spreadsheet without translation.
Pro Tip: If you manage several similar job types (kitchen remodels, bathroom remodels, additions), turn on Classes and assign one per job type. You'll be able to run a Profit & Loss by Class alongside your project reports and instantly spot which category of work is actually your most profitable.
Two things break job costing more than anything else in QBO. First, estimates that don't roll into the project usually mean the estimate was created against the wrong parent customer, or created before the project existed. Second, missing costs almost always trace back to untagged bills or payroll that was never allocated to a job, both of which are covered in Miter's practical walkthrough on enabling two-sided items and hourly cost rates correctly the first time.
How Do You Track Job Costs in QuickBooks Desktop?
QuickBooks Desktop handles job costing through fields and forms rather than a unified dashboard, so the setup is more manual but no less capable once it's built correctly.
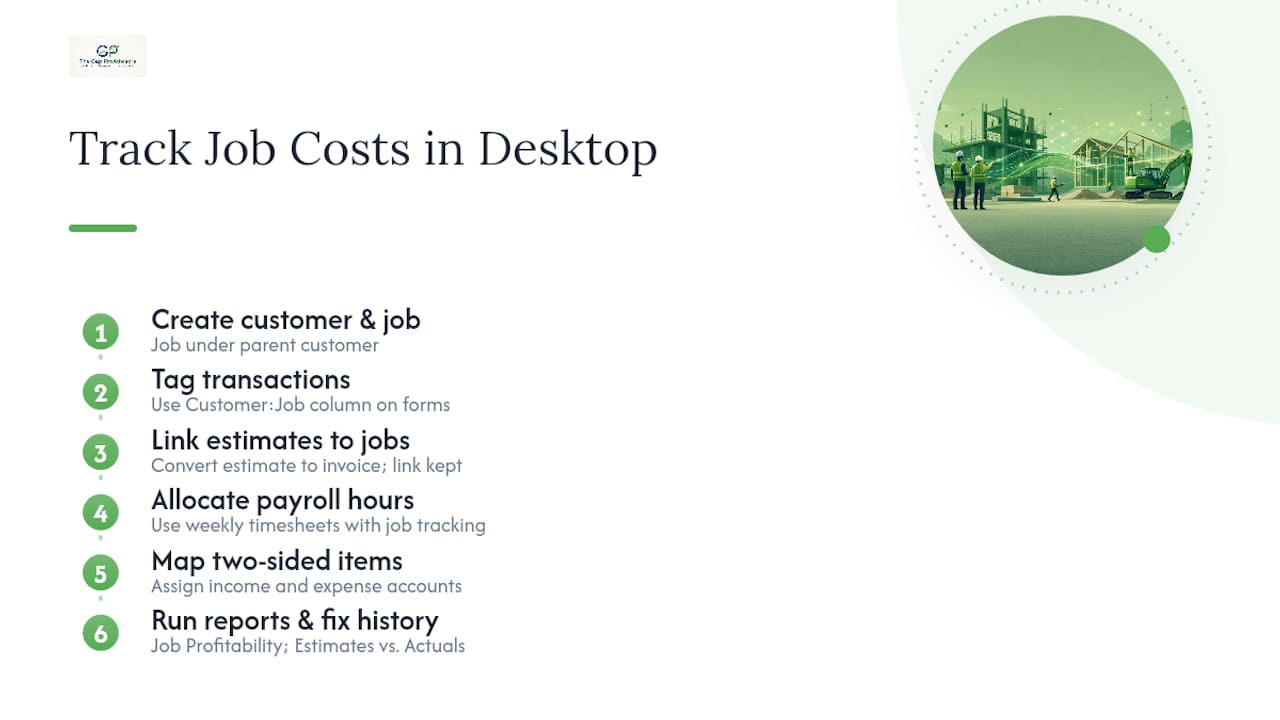
Start by creating your customer and job structure. Each job needs to sit underneath its parent customer in the Customer Center, and you should create a new job entry for every distinct project even when you're doing repeat work for the same client. On every bill, check, and credit card charge, use the Customer:Job column to tag the transaction. This column often sits off to the side of standard forms, and it's easy to skip when you're moving fast, which is exactly why untagged transactions are the number one source of inaccurate job-cost reports in Desktop files.
Set up estimates and link each one directly to its job, the same way you would in Online. When you convert that estimate into an invoice, QuickBooks preserves the link, which is what allows the Estimates vs. Actuals report to function. For payroll, Desktop's job-costing structure lets you allocate hours to specific jobs through weekly timesheets, provided your payroll setup includes job tracking on the timesheet itself, not just the paycheck.
A few Desktop-specific notes matter here. Two-sided items work the same way conceptually as in Online: map each item to both an income and expense account so job-cost reports capture margin, not just revenue. The reports to run are Job Profitability Summary, Job Profitability Detail, and Job Estimates vs. Actuals, all found under the Jobs, Time & Mileage report category.
If you're staring at historical transactions that were never tagged, don't panic and don't re-enter everything from scratch. Open each transaction, add the Customer:Job in the appropriate column, and save. It's tedious for a backlog of months, but it's the only way to correct the data without breaking reconciliation. This kind of cleanup is exactly the work a QuickBooks cleanup service is built to handle when the backlog stretches past a few dozen transactions.
Where Do Labor, Materials, and Overhead Costs Belong?
Getting job costing right depends less on which QuickBooks version you run and more on whether every cost type lands in the correct place. Here's how the major cost categories map to QuickBooks:
| Cost Type | Where to Record It | Notes |
|---|---|---|
| Direct labor | Time entries tagged to project/job, with hourly cost rate set per employee | Cost rate should include burden, not just wage |
| Subcontractors | Bills entered against the job, using a two-sided "Subcontractor Labor" item | Mark billable if you're passing the cost through with markup |
| Materials | Bills or checks tagged to the job, using two-sided material items | Distinguish direct materials from general shop consumables |
| Equipment | Bills, checks, or an internal equipment-rate item charged to the job | Use an internal rate item if you own equipment outright |
| Travel and reimbursables | Expenses tagged to the job, marked billable when appropriate | Don't let these get lost in a general "Auto" expense account |
| Overhead | Company-level expense accounts, not tagged to any job | Overhead should never distort individual job margins |
The most consequential number on that table is the burdened labor rate. If an employee earns $25 an hour, their true cost to a job is meaningfully higher once you add employer payroll taxes, workers' compensation premiums, benefits, and a reasonable overhead allocation. A shop that only tracks the $25 wage in its job-cost reports will consistently overstate margin on every labor-heavy job, sometimes by 20% or more depending on your state's workers' comp rates.
Use the billable checkbox deliberately. Reimbursable travel, permit fees, and pass-through subcontractor costs should be marked billable so they flow to the customer's invoice automatically. General shop supplies, small tools, and consumables that support your business broadly, not a specific job, belong in overhead, never coded to a job just because a job happened to be open that week.
Pro Tip: Set hourly cost rates for each employee inside Projects and review them every quarter. Insurance premiums, payroll tax rates, and workers' comp classifications shift throughout the year, and a stale burden rate silently erodes the accuracy of every job report that depends on it.
Which Reports Actually Show Job Profitability?
Running the right report matters as much as tagging your transactions correctly, because a well-tagged file with the wrong report open still hides the problem you're trying to catch.
| Report Name | What It Shows | Watch For |
|---|---|---|
| Project Profitability (QBO) | Income, costs, and margin by project in one view | Margin trending below your estimate at 25% job completion |
| Profit & Loss by Customer/Job | Revenue and expense detail broken out per job | Costs posted to the wrong job or customer |
| Expenses by Project | Every expense transaction tagged to a project | Untagged expenses missing from the total |
| Time Cost by Employee/Vendor | Labor hours and cost by person, filterable by job | Labor variance by the second week of a job |
| Unbilled Costs by Job | Costs incurred but not yet invoiced to the customer | Costs sitting unbilled for more than two billing cycles |
| Estimates vs. Actuals | Original budget compared against real costs to date | Any category running significantly over budget mid-project |
Construction-focused finance guidance treats gross margin by job, cost variance, and burn rate as core KPIs worth watching on a recurring cycle, not just at project close. Waiting until a job wraps to check its numbers means you find out about a problem after it's too late to fix it.
Build a routine around these reports instead of opening them only when something feels wrong. A fifteen-minute weekly check on active projects, scanning Project Profitability and Unbilled Costs, catches labor overruns and forgotten invoices while there's still time to act. At monthly close, reconcile every unbilled cost, confirm payroll allocations landed on the right jobs, and pull Estimates vs. Actuals on any project past the halfway mark. Filter these reports by job status or date range when you manage more than a handful of active projects, so problem jobs surface without you scrolling through ones that are running fine.
Best Practices and Common Mistakes in QuickBooks Job Costing
Job costing lives or dies on habits, not features. QuickBooks gives you the tools; consistency determines whether the numbers they produce are trustworthy.
Do this:
- Tag every single transaction to its project or job, without exception.
- Use two-sided items for anything that has both a cost and a price.
- Set and update burdened labor rates, not just gross wages.
- Review Project Profitability weekly while jobs are active, not just at closeout.
- Reconcile unbilled costs before sending a final invoice, so nothing gets missed.
Don't do this:
- Don't let general overhead expenses get coded to individual jobs just because it's convenient.
- Don't create estimates outside the project structure and expect QuickBooks to connect them retroactively.
- Don't ignore payroll burden or skip time capture because "we'll estimate it later."
A monthly checklist keeps these habits from slipping once the busy season hits. Reconcile bank and credit card activity tied to active projects, review whether your item costs still reflect current material and labor pricing, confirm payroll allocations match actual crew assignments, and formally close out any project that's finished so it stops cluttering your active-project reports.
Many contractors assume they need a paid add-on to get real job costing, but a properly configured Projects setup with disciplined tagging is often sufficient without buying anything else. The discipline, not the software tier, is usually the missing piece.
Which Integrations Actually Improve Job Costing?
Not every add-on earns its subscription fee, and stacking integrations before you've mastered the basics usually just adds complexity without improving accuracy.
QuickBooks Time (formerly TSheets) is the highest-value integration for most contractors, because it syncs crew hours directly into Projects and applies burdened labor rates automatically instead of relying on someone transcribing paper timesheets at the end of the week. Field crews clock in through QuickBooks Workforce, the mobile companion app, and those hours flow straight into the job without a manual data entry step. Receipt-capture tools come next on the priority list, letting a foreman photograph a material receipt from a supply house and have it land in the right job's expense feed the same day, rather than surfacing three weeks later during reconciliation.

Specialized construction add-ons for WIP (work-in-progress) accounting and AIA-style pay applications belong at the bottom of that list, added only once you've genuinely outgrown what Projects or Customer:Job can do. Signs you've hit that point include needing certified payroll reports for public works jobs, tracking retainage across multiple draws, or managing WIP schedules that your bonding company or bank requires in a specific format. If you're evaluating estimating tools that plug into QuickBooks to tighten the budget side of this process, guides like Firmanager's estimating software roundup are worth reviewing before you commit to one.
Pro Tip: Sync time tracking first, add supplier receipt capture second, and hold off on WIP or AIA billing tools until your contract accounting genuinely requires them. Adding integrations in the wrong order usually means paying for capability you can't use yet while the actual gap, accurate labor hours, goes unsolved.
How The Gap ProAdvisors Helps With QuickBooks Job Costing
Setting up job costing correctly the first time saves you months of chasing down miscoded transactions later, and that's exactly where Mygappro steps in for contractors and small business owners who'd rather run their business than reconstruct a QuickBooks file.
- QuickBooks setup for job costing: building your Projects or Customer:Job structure, two-sided items, and burden rates correctly from day one.
- Ongoing bookkeeping: keeping every bill, check, and expense tagged to the right job on a monthly basis, not left to pile up.
- Payroll setup and burden mapping: making sure labor costs flowing into your job reports reflect true cost, not just gross wages.
- QuickBooks cleanup and catch-up: correcting a backlog of untagged transactions so your historical job reports finally tell the truth.
Contractors working with Mygappro typically see cleaner project-level profit and loss statements, fewer surprise cost overruns discovered after a job closes, and faster invoicing because unbilled costs get caught before they're forgotten. If your QuickBooks file already feels behind or your job reports don't match what you know is happening in the field, the remote bookkeeping services team can take that maintenance off your plate entirely, or you can start with a QuickBooks cleanup if the backlog is the more urgent problem.
Editorial Perspective: What Contractors Get Wrong About Job Costing
The conventional advice on job costing QuickBooks always leads with features: enable Projects, build items, run reports. That's necessary, but it skips the part that actually determines whether the numbers mean anything, which is discipline at the point of data entry.
Here's what gets underestimated: a QuickBooks file with perfect Projects setup and zero tagging discipline produces reports that look authoritative and are completely wrong. A foreman who forgets to note which job he worked yesterday, an office manager who codes a mystery bill to "miscellaneous" instead of asking which job it belongs to, a bookkeeper who doesn't know to mark travel reimbursable, each of these breaks the chain quietly. The report still runs. The number still prints. It's just false, and false numbers that look official are more dangerous than no numbers at all, because they get trusted.
The other place contractors get burned is burden rates. Plenty of small business owners set an hourly cost rate once, during initial setup, and never touch it again. Workers' comp premiums shift. Payroll tax rates change. A crew member gets a raise. Two years later, every job report is quietly overstating margin because the labor cost baked into the system is stale. This is not a QuickBooks failure; it's a maintenance failure, and it's the single most common reason a contractor's books say they made money on a job that actually broke even.
If you take one thing from this article, prioritize the habit over the feature. Buy the right plan, build the right structure, and then treat tagging every transaction as non-optional, the same way you'd treat signing a timesheet. The software is not the hard part.
Job Costing Made Simple With Mygappro
Building a job-costing structure that actually holds up under real-world chaos, missed tags, stale burden rates, forgotten receipts, takes more than a one-time setup session. Mygappro exists for exactly this: contractors and small business owners who want their QuickBooks file to reflect the truth every month, without hiring an in-house bookkeeper or spending weekends reconciling projects themselves.
Where a DIY approach often breaks down is consistency. You can watch a tutorial and set up Projects correctly on a Tuesday afternoon, but six months of busy season later, tagging discipline slips, burden rates go stale, and nobody notices until a job that looked profitable barely breaks even. That's the gap Mygappro closes: an ongoing partner who keeps your file current every month, not a one-time setup that fades. For contractors weighing whether to manage this in-house or bring in support, T-Ledgers' comparison of DIY versus professional bookkeeping lays out the tradeoffs worth considering before you decide.
Mygappro's remote bookkeeping services include QuickBooks setup, monthly maintenance, payroll allocation, and job-cost accuracy checks built specifically for small business owners and contractors managing multiple active projects. If your job reports already feel unreliable, start with a QuickBooks cleanup to fix the backlog first. Ready to see where your file stands? Schedule a QBO health check today and find out exactly what's costing you accuracy.
Sources
- Project profitability with job costing software - QuickBooks - Intuit
- Track job costs in QuickBooks Desktop - Intuit
- QuickBooks for Contractors: Job Costing Setup Guide for 2026 - Contractor Guide Pro
- How to implement job costing in QuickBooks
FAQ
How Do You Use Job Costing in QuickBooks Desktop?
Create a Customer:Job structure under each customer, tag every bill, check, and estimate to the correct job using the Customer:Job column, and run the Job Profitability Summary and Estimates vs. Actuals reports to see results.
How Do You Calculate Job Costing?
Job costing adds up all direct costs tied to a project, labor (including burden), materials, subcontractors, and equipment, then subtracts that total from the revenue billed on that job to reveal true gross margin.
How Do You Track Job Costs in QuickBooks?
Enable Projects in QuickBooks Online or use Customer:Job in Desktop, build two-sided items so costs and revenue route through the same line, and tag every transaction, including time entries, to the specific job as you enter it.
What Accounting Software Can I Use for Job Costing?
QuickBooks Online with Projects (Plus or Advanced plans) and QuickBooks Desktop with Customer:Job are the two most widely used options for small contractors, and Mygappro helps set up and maintain either version correctly for accurate project profitability.
Which QuickBooks Plan Do I Need for Job Costing?
QuickBooks Online requires the Plus or Advanced plan since Projects and budget-versus-actual tracking aren't included in Simple Start or Essentials; QuickBooks Desktop supports job costing across its standard editions through the Customer:Job structure.